skip to main |
skip to sidebar

 Just B Card Class:
I'm teaching my Just B card class today and wanted to make some special things for my customers. I got these ideas from my upline melissa but the designs are created by me.
Here is how I made each item:
Water bottle is a sheet of stampin up blue bayou paper and then I used a stampin up sponge and inked blue bayou and wild wasabi ink on the paper.. This is hard to see but it made the paper looked textured. I think used my scallop punch and punched a piece of wild wasabi paper and then using my circle punch i punched out sky blue paper. I then used the Bee stamp from the stampin up Just B stamp set
and tempting turquiose ink and placed that on my circle i punched out. I think added some wild wasabi ribbon to the top of the water bottle I used liquid glue for the bottle of the water bottle and snail glue for the top of the bottle. I also used stampin dimentionals for the punched out symbol. And that is how the water bottle is made.
The Note Pad: Very simple to make. I started out with a note pad from the dollar store. I think choose old olive paper and inked the sides using my old olive classic ink pad. I then used my stampin up spiral punch to make the sure the paper would fit around the spiral wire of the note pad. I think used a smaller piece of More Mustard paper and used my More mustard classic ink pad to destress the sides of the paper. I used the words HAPPY and CUZ from the Stampin up Just B stamp Set in elegant Eggplant and stamped them on the More Mustard Paper. I then used my scallop punch and Elegant Eggplant paper and my circle punch with whisper white paper. I think took my classic ink pad in Elegant Eggplant and stamped the Bee Image on the circle punch paper. I used the Elegant Eggplant ribbon to make a bow at the top. I used Snail glue and stampin dimentionals to put the note pad together. Hope you like it.
O-k Here is the gift bag. I started out with a white paper gift bag from walmart. I then took purely pomegranate paper and cut it to fit the bag with a extra 2 inches at top for handle. I think took a piece of Stampin up designer series paper in ginger blossom. and a piece of Groovy Guava. I then took the letter B , the word MINE and the flower from the stampin up stamp set Just B and stamped these images on the paper. The flower was stamped on whisper white paper. I used a stampin up rhinestone square brad in ice green for the flower. I then added a strip of Groovy Guava ribbon at the top. I used my Word Window punch to make the handle. I used snail glue and stampin dimentionals for put everything in place.
Enjoy.
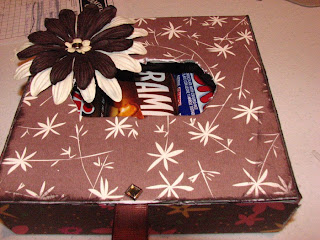
The Chocolate Box: This is a prize I made for my card class. I used a blank chipboard box and I covered it in Stampin Up designer series paper. I used my Anywhere glue to hold the paper to the box. I used my stampin up sanding block to give the opening a rough look. I used my classic ink pad in chocolate chip to destress the sides of the box. I added some flowers and I used a stampin up rhinestone circle brad to hold the flowers in place with some liquid glue too. I think poked a hole in the top for a handle. I used stampin up ribbon in chocolate chip and a rhinestone square brad to old it in place. I then put chocolate bars in the box.. I think everyone will want to win this box.. Yummy !!!!!
Hope you enjoyed my creations sorry the post is so long.. If you have any questions please feel free to ask.

 Birthday Stamp - A - Stack
Saturday May 10th, 2008
10am to 2pm
Fergus , ontario
Cost $30 for class, or $25 for kit
Come Make 15 Birthday Cards. There is 5 different designs that reflect different genders and age groups. You will make 3 of each card. Many of the cards can be altered as you make them to fit your needs.
While doing the stamp a stack class you will have the chance to learn many new techniques that you can try at home with your own card making and scrapbooking projects.
space is limited to 6 people so please RSVP . If you can't make the class I offer the kit. The kit will have everything cut and stamped for you.. All you need to do is put it together.
Refreshments will be served along with Tim Hortons home brewed coffee and chocolate treats...
Hope to hear from you soon
Lisa
 Crop For The Cure:
This is an amazing event that is taking place on Saturday June 7th 2008. from 9am to 4pm at the Listowel Kin Station the address is 555 Binning Street West. The cost is $35 and it includes lunch, goodie bags and a chance to win door prizes. This is going to be a awesome day and tickets are half sold out so please don't wait... Register today with tracey by visiting her web site
www.cropforthecure.ca
At this event I will be the stampin up consultant. At the event I will be offering all my stampin up stamp sets, punches inks and tools for a small user fee for the day. I'm happy to have a vendor table to feature some of my creations.
I am happy to take orders to be delivered at the crop until May 23, 2008, with an order of $50 or more you will get a free classic ink pad from me in your colour choice.
Im also very excited to be doing a make and take with the ladies at the crop. Although its a surprize I am featuring the textured wild wasabi cardstock in honor of our turtle friends.
Please drop by my vendor table to buy your boobs length of tickets ($5) for my gift basket. It features over $100 in stampin up products and I will be donating the profit to the cancer society in honor of my grandmother. A pictures of the basket is featured in this post.
Hope to see you there
Cheers
Lisa
 Your Story:
Because my pregnancy and Marleys birth were not a text book story, I really wanted a way to tell Marley her story when she was really old enough. So for this reason i made a little pocket in this layout to hold the story of her birth and the challenges that came along the way.
This will be the running joke of my blog but i started out with the colour wheel.. If i don't you will see layouts with orange and hot pink together because i am so sure i must be colour blind on some days and plus if you look back on layouts years ago you would think that blue and purple cardstock was on sale because that i all i ever used.. I don't know why.. so this way i always have a good arrangement of colour in my scrapbook..
This layout is on Orchid Opulence cardstock and my secondary colour is Rose red
I used my snail glue to place the paper and photos on the layout. I used my stamp a ma jig to aline my title. For my title I used my Lovely Letters stamp set in Rose Red classic ink pad. I also used the whisper white card stock for the titles.
 Its a Girl:
This layout is a 2 page layout. The first side is highlighting the day we found out we were expecting a girl and the second side is highlighting the day our daughter Marley was born..
Of Coarse my first tool I used was the colour wheel.. I had a patterned paper that i got at my fav. scrapping store (the turtle) and I wanted to try and match the colours featured in that paper with my stampin up card stock. so the colours i Choose were : Tempting Turquoise, Cameo Coral, and Pretty in Pink . I inked the side of each paper using my Stampin up classic ink pads in the same colour as the card stock. I used my Snail adheasive and liquid glue to place all my photos, paper and chipboard to the layout. I also added a bit of ribbon. It is stampin up Tempting Turquoise
 Here is the first layout of Marleys baby book:
First I used my Stampin up colour wheel. I start every layout with that because I can't match colours to save my life. This tool has all the colours from teh 4 colour familys stampin up offers and tells you a variety of colour choices that would work well. The cardstock I choose was Regal Rose, Almost amethyst, and Certainly Celery. I used my snail adheasive to place the ultra sound photos on the layout. I think used my stamp a ma jig to help me place my title in a straight line. For my letters I used the Defining Alphabet stamp set. For some textures to the page I used my soft subtles buttons and stampin up liquid glue. lastley I used my stampin up markers to write my journaling.
Hope you enjoy
Cheers
Lisa

 Meet Marley:
This is our Daughter Marley. Marley was born on Thursday Nov. 29, 2007 at McMaster Children's Hospital at 11:26pm. When Marley was born she weight 2lbs and 8 ounces. She spent 14 weeks in the Nicu . We came home at the end of Feb. Life in the NICU seems so long ago but we were very blessed to have such wonderful medical staff to support us and Marley during this time..
These are 2 recent pictures of Marley. She is now 4.5 months old and a healthy 10pounds...
Thanks for looking
Cheers
Lisa
 Tissue Box
This tissue box was very easy to make. I used a wooden box from a crafting store. I used my Stampin up anywhere glue and glued on my Stampin up designer paper in Flowers for you and that was it.. Very simple and fast and makes a great gift.
Thanks for looking
Cheers
Lisa
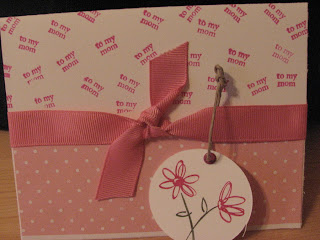 Mothers Day Card:
This is the first post where I am going to try and add a picture. I have never done this before so please bear with me if this doesn't work.
I made this card for my mum for Mothers day
Here is what I used
Stampin up whisper white paper
5/8 Grosgrain ribbon in regal rose
linen thread
1 - 3/8 circle punch
spring fling designer paper
eyelet
crop a dile
stampin up markers in regal rose and Glorious green
All year cheer 3 stamp set
Please enjoy my first card. I hope to be adding many more in the near future so please check back often. If you have any questions or comments I would love to hear from you.
Cheers
Lisa
WELCOME TO MY FIRST BLOG
I have never been on a blog before so please bear with me while I take the time to learn what this is all about.
I am so excited to start this blog so I can post cards and scrapbook layouts I create for my friends, family and customers to enjoy and be inspired from.
I am a stampin up demonstrator and I just love to create cards and scrapbooking albums for my friends and family. I have also begun to do more alter scrapbooking.
I hope in the future posts you leave feedback for me and please feel free to ask questions or make suggestions that can help me make this a great blog that you will want to return to time and again.
Cheers
Lisa